Posts with tag: Science fair

Science Fair Project Ideas That Use Real Physics

A levitation project stands out at a science fair because nothing else on the table is doing it. The catch is that the best version needs liquid nitrogen, and the version that needs none is a different project with different physics. This page sorts out which one you can actually build, then covers the planning, safety and presentation that decide your score.

Three projects, sorted by what you can get hold of

Start here: six ways to demonstrate levitation
An overview of the whole field — still magnets, ring magnets, DIY tracks and three superconductor demonstrations. Read this first if you have not settled on a project yet.

Maglev train — no liquid nitrogen
Permanent magnets and a guide-walled track. Buildable in any classroom with no cryogenics and no special safety approval. Best suited to demonstrating friction, load and the limits of magnetic stability.

Superconductor hoverboard — needs liquid nitrogen
A YBCO disc cooled to −196 °C locks above a magnetic track and stays there at any angle. This is true stable levitation and it wins fairs, but you need a supply of liquid nitrogen and an adult supervising.

Which one should you pick?

Start with the liquid nitrogen question, because it decides everything else. If you can get a few litres through a school lab, a university department or a local welding or medical supplier, build the superconductor project — it demonstrates a genuine quantum effect and there is no way for a judge to mistake it for a trick. Our liquid nitrogen guide covers where to buy it and how to transport it.

If you cannot, do not treat the magnet project as a consolation prize. It answers a real engineering question — why do trains have a speed ceiling, and what happens when you remove the wheels — and it gives you something the superconductor project does not: a quantity you can vary and measure repeatedly in an afternoon.

Planning it properly

Judges reward a question with an answer, not a demonstration. Before you build anything, write down the variable you are going to change, the quantity you are going to measure, and what you expect to happen. A project that measures levitation height against load and plots the curve beats a project that simply makes something float, every time.

Then plan the practical side:

  • The steps of the experiment, in the order you will run them
  • Every material and instrument, including the ruler or scale you will measure with
  • How many times you will repeat each measurement — three runs minimum, so you can show your results are not a fluke
  • How you will record results as you go, rather than reconstructing them afterwards
  • A realistic timeline, working backwards from the fair date

Do a literature review before you start, too. Knowing that Earnshaw’s theorem forbids stable levitation with permanent magnets alone, or that flux pinning is what holds the superconductor in place, turns a demonstration into an explanation — and judges ask exactly these questions.

Safety comes first

The magnet project has two hazards worth naming in your write-up: strong neodymium magnets can pinch badly when they snap together, and they will erase cards and damage phones and hard drives kept nearby.

Liquid nitrogen needs more care. It boils at −196 °C, so it causes cold burns on contact, and it displaces oxygen as it evaporates. Handle it with an adult present, in a ventilated room, wearing eye protection and insulated gloves, and never seal it in a closed container. The handling guide covers storage, transport and what to do if it spills. Schools running this as a class activity can also use our institutional ordering route, which includes a risk assessment template.

Presenting to the judges

Lead with the question, not the apparatus. Show your data — a graph beats a photograph — and be straightforward about what your setup does not prove. If your maglev train relies on guide walls for stability, say so and explain why the physics requires them. Admitting a limitation and explaining it reads as understanding; hiding it reads as not knowing.

Practise the demonstration until it works reliably, and have a plan for when it does not. Judges will ask why it works, so rehearse that answer in plain language before you rehearse the technical version.

The physics behind it

If you want to understand what you are demonstrating, the Meissner effect versus flux pinning explains why a superconductor holds its position instead of sliding away — the two are routinely confused, and getting it right will distinguish your project. What superconducting levitation is covers the underlying mechanism, and The Physics collects the rest of our explanatory articles.

Magnetic Levitation Science Project

This project levitates a small train on permanent magnets alone — no liquid nitrogen, no cryogenic handling, no special safety kit. That makes it one of the few levitation projects you can build and demonstrate in an ordinary classroom. If you can get hold of liquid nitrogen, the superconductor hoverboard project shows genuinely stable levitation and tends to score higher with judges.

Why would anyone want a train that floats?

Moving anything takes energy. A train resists changes to its velocity in proportion to its mass, which is why a heavier train needs a bigger push to get going, and why that push costs more fuel. Getting up to speed is only half the problem, though. Once a train reaches cruising speed it still burns energy continuously, because resistance forces are constantly trying to slow it down.

Two forces dominate. Air drag grows sharply with speed. Rolling friction comes from the wheels themselves — steel wheels flexing against steel rails, bearings turning, and wheels slipping when the grip runs out. Wheel slip is the practical ceiling: past roughly 300 km/h, conventional wheeled trains start fighting their own contact patch more than the air.

Remove the wheels and you remove that ceiling. A train that never touches its track has no rolling friction and no wheel slip, leaving only air drag to overcome. That is the entire argument for magnetic levitation, and it is the argument your project is demonstrating.

Why magnets alone refuse to hold still

Magnets are the obvious way to lift something without touching it. Put two magnets close together with like poles facing and they push apart hard enough to carry real weight.

The catch is stability. Try balancing one magnet above another and it will not simply hover — it flips, slides sideways and falls. This is not a matter of technique. It is a result known as Earnshaw’s theorem: a stationary object cannot be held in stable equilibrium by permanent magnets alone. Every position that looks balanced is balanced the way a pencil is balanced on its tip.

Real maglev systems solve this with an active stabilising mechanism — sensors and electromagnets that strengthen the field when the train drops and weaken it when the train rises, thousands of times per second. A classroom project solves it mechanically instead, with guide walls that physically stop the train escaping sideways while the magnets carry its weight.

That distinction is worth stating plainly in your write-up, because it is the single point most projects get wrong. Your train is magnetically supported and mechanically guided. It is not freely levitating. The only tabletop way to get true stable levitation without contact is flux pinning in a superconductor, which is a different experiment and needs liquid nitrogen.

What you need

  • A magnetic steel plate, roughly 7.5 × 30 cm, to act as the track base
  • About 70 permanent cube magnets, 10 × 10 × 2 mm
  • A Perspex cube for the train body, with double-sided adhesive
  • Perspex spacers to set the width of the track channel
  • A ruler, adhesive tape and a few non-magnetic coins for the measurements

The magnetic train kit contains all of the above along with step-by-step assembly videos, if you would rather not source the magnets individually.

Building the track

  1. Lay the wider Perspex spacer along the centre of the steel plate. This sets the channel the train will run in.
  2. Fill one side of the spacer with cube magnets, all pointing the same way. The steel plate holds them in place while you work.
  3. Fill the other side the same way, keeping the polarity consistent along the whole run.
  4. Fit magnets to the underside of the Perspex train cube so that it faces the track with the same pole, producing repulsion.
  5. Add the guide walls either side of the channel, close enough to stop the train tipping out but not so close that they drag.
  6. Set the train down in the channel. It should float a few millimetres clear and glide with a light push.

One detail trips people up: magnets attract when stacked along the field direction, but two magnets placed side by side attract only when their polarities are opposed. If a section of your track keeps flipping magnets around as you lay them, the polarity of that row is fighting its neighbour — turn the row over rather than forcing individual pieces.

Experiments worth running

A track that floats a train is a demonstration, not an experiment. What turns it into a science fair project is measuring something and explaining the result.

  • How much can it carry? Tape coins to the top of the train one at a time until it settles onto the track. That load is your levitation capacity.
  • How does height vary with load? Measure the gap with a ruler after each coin, then plot height against weight. The line is not straight — can you explain why the force climbs so steeply as the gap closes?
  • Does magnet count matter? Compare four magnets under the train against two. Does twice the magnet give you twice the clearance?
  • Where does the energy go? Give the train a consistent push and time how far it travels. With rolling friction gone, what is actually slowing it down?

Presenting it well

Judges reward projects that answer a question rather than projects that perform a trick. Lead with the physics problem — friction limits how fast trains can go — then show your height-versus-load graph as evidence of how the magnetic force behaves. Be upfront that the guide walls are doing the stabilising work, and explain why Earnshaw’s theorem makes them necessary. That honesty reads as understanding, not as a shortcoming.

If you want to go further, flux pinning versus the Meissner effect explains how superconductors achieve the stability that permanent magnets cannot, and our science fair project ideas covers how to structure and present the finished board.

What Is Superconducting Levitation and How Does it Work? 

Published: December 6, 2022 в 4:48 pm

Author:

Categories: Experiments,The Physics

Tags: ,,,,,,

Cool a disc of YBCO below about 92 K and set it near a magnet, and it does not merely float — it holds position. Push it sideways and it springs back. Turn the whole assembly upside down and it hangs there instead of falling. That last part is what separates superconducting levitation from every magnet trick you have seen, and it is not the effect most people name when they explain it.

What you are actually looking at

A superconducting levitation demonstration shows three distinct behaviours, and it is worth naming them separately because they have different causes:

  • Levitation — the disc floats above the magnet at a fixed height.
  • Suspension — invert the setup and the disc hangs below the magnet without falling. No arrangement of ordinary magnets does this.
  • Locking — tilt the magnet and the disc keeps its angle and separation, as though held on an invisible rail.

Repulsion alone explains the first. It cannot explain the second or third at all.

Two effects, working at once

Two separate phenomena are happening in the disc simultaneously, and the demonstration only makes sense once you separate them.

The first is the Meissner effect. Below its critical temperature a superconductor expels magnetic field from its interior, becoming a perfect diamagnet. Screening currents flow without resistance at the surface and generate a field opposing the external one, so the superconductor behaves like an opposing magnet and is pushed away. This produces repulsion — and repulsion alone is unstable, in the same way that balancing one magnet above another is unstable.

The second is flux pinning, and it is what makes the demonstration remarkable. In a Type II superconductor such as YBCO, a strong enough field is not fully expelled: it penetrates the material as discrete tubes of magnetic flux, called fluxons or vortices. Those tubes become trapped at pinning centres — defects, grain boundaries and other places where superconductivity is locally weaker. Moving the disc would mean dragging the trapped flux through the material, which costs energy, so the disc resists being moved in any direction. That is why it holds height, resists sideways pushes, hangs upside down and keeps its angle.

The popular name for the second effect is “quantum locking”. If you want to see the two separated experimentally, the Meissner effect versus flux pinning sets out a procedure that isolates each one with a spare magnet and a pair of plastic tweezers.

Why it has to be cold

Every superconductor known today has a critical temperature, Tc, below which resistance vanishes and above which it behaves like an ordinary material. YBCO switches over at roughly 92 K, which is −181 °C.

That number is the reason these demonstrations exist outside specialist laboratories. Liquid nitrogen boils at 77 K, comfortably below YBCO’s transition, and it is cheap and widely available. Before 1987 the known superconductors needed liquid helium at around 4 K, which is neither. The rise of high-temperature superconductors covers how the field crossed that threshold, and what superconductivity is covers the underlying state itself.

Why ordinary magnets cannot do this

Earnshaw’s theorem rules out holding an object in stable equilibrium using permanent magnets alone. Every apparently balanced position is balanced the way a pencil balances on its tip, which is why magnet-only levitation projects need guide walls or a spinning top or active electromagnets to stay put.

Superconductors are the exception, because pinned flux supplies a genuine restoring force rather than a knife-edge balance. If you want to compare the two side by side, the maglev project built from permanent magnets shows exactly where mechanical constraint has to substitute for real stability, and maglev magnets covers how full-scale trains solve it.

What sets the strength of the force

Two quantities dominate how much weight a disc will carry and how firmly it holds position.

Critical current. The maximum levitation force depends strongly on the largest internal current the superconductor can sustain, Ic. A typical value for a modern high-Tc material is around 500 A for a 1 cm-wide tape at 77 K. Higher critical current means a stronger levitation force.

Field strength and gradient. The forces come from the energy change when fluxons move within the material and in and out of pinning centres. A stronger external field means more fluxons and so more force required to move them. A field that varies sharply over a short distance — a steep spatial gradient — means moving the disc displaces its trapped flux more, which stiffens the hold further. This is why demonstration tracks use closely spaced magnets in alternating orientation rather than one large uniform magnet.

How long it lasts

The effect persists exactly as long as the disc stays below its critical temperature. In practice a well-cooled YBCO disc in open air holds for a few minutes before it warms past Tc, at which point the levitation stops abruptly rather than fading — the material is either superconducting or it is not. Re-cooling restores it, and the disc is not damaged by the cycle.

One detail that surprises people: the height and angle the disc returns to are set at the moment it was cooled, not by where you place it afterwards. Cool it while it sits on a spacer above the magnet and it will return to that gap each time. This is called field cooling, and it is the reason a demonstration is set up with the disc already in position.

Seeing it yourself

The materials are ordinary enough now that this is a tabletop demonstration rather than a laboratory procedure: a YBCO disc, a magnetic track and about half a litre of liquid nitrogen. Hands-on quantum physics covers what running it actually involves, the liquid nitrogen guide covers sourcing and handling the coolant safely, and our science fair guide covers building it into a project with measurements a judge will credit.

Superconductor Hoverboard Science Fair Project: Build It and Measure It

Published: September 19, 2022 в 1:36 pm

Author:

Categories: Science fair,The Physics

Tags: ,,,,

A superconductor cooled in liquid nitrogen will hang in mid-air above a magnetic track and glide along it with almost no friction — a real hoverboard, at desk scale. It also makes an unusually strong science fair project, because unlike most levitation demonstrations you can measure it, not just admire it.

What you are actually demonstrating

This is the part most projects get wrong, and getting it right is what separates a good board from an average one.

Two different effects are at work, and they are not the same thing:

  • The Meissner effect is the superconductor expelling magnetic field from its interior. On its own it produces repulsion — and repulsion alone is unstable. A magnet floating purely by repulsion slides off sideways almost immediately.
  • Flux pinning is what actually holds the disc in place. YBCO is a type-II superconductor, which means magnetic field does not get expelled completely. Instead it threads through the material in thousands of discrete quantised tubes, or vortices, and defects in the ceramic trap those vortices where they are. The disc is effectively pinned to the field pattern it was cooled in.

That distinction is why the disc will hang below a magnet, or sit locked at an angle, and stay there. Pure repulsion cannot do that. If your write-up says “the Meissner effect makes it float”, it is not quite right — and a physics teacher will notice.

Turning a demonstration into an experiment

A levitating disc is a spectacle. A science project needs a question with a measurable answer. The demonstration becomes an experiment the moment you introduce something you can change and something you can measure.

Workable questions, in rough order of difficulty:

  1. How does levitation height depend on the field strength below the disc? Change the number of magnet layers; measure the gap.
  2. How long does levitation last, and what determines it? Time from removal of coolant to the disc touching down, against ambient temperature or disc thickness.
  3. How does track spacing affect how freely the disc moves? Vary the gap between magnet rows; measure how far a single push carries the disc.
  4. Does the cooling height change the pinning? Cool the disc at 3 mm above the track, then at 10 mm, and compare where it comes to rest. This one surprises people, and it is the most direct evidence of flux pinning there is.

Question 4 is the strongest project of the four, because the result is counter-intuitive and it tests the actual mechanism rather than just the outcome.

What you need

  • A YBCO superconductor disc (a “levitator”)
  • Neodymium magnets, 10 × 10 × 2 mm
  • A steel sheet to build the track on
  • Track spacers
  • Plastic tongs — never handle a cooled disc with bare fingers
  • Liquid nitrogen, roughly half a litre, and a shallow foam tray
  • A ruler or calipers, and a phone that can shoot slow motion

Everything except the liquid nitrogen is in the superconductivity kitsthe two-minute kit guide will tell you which one fits. Liquid nitrogen has to be sourced locally — the liquid nitrogen guide covers where to buy it and how to handle it safely.

Build 1 — the magnet matrix

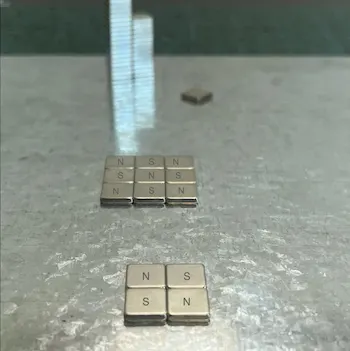
Magnets arranged in a matrix with alternating polarity for quantum locking

Lay the magnets on the steel sheet in a square — 2 × 2, then 3 × 3, then 4 × 4. Orient them so that neighbours attract side by side, which means adjacent magnets point in opposite directions. This alternating arrangement produces a strong, sharply varying field just above the surface, which is exactly what gives the vortices something to pin to.

Cool the disc in the tray for about a minute, until the vigorous bubbling settles down. Lift it with the tongs and place it a few millimetres above the matrix.

Push it gently sideways, then downwards, then try to rotate it. It resists in every direction — not just upwards. That is the observation worth recording, because it is what rules out simple magnetic repulsion.

Build 2 — the straight track

Rearrange the magnets into two parallel rows: neighbours across the track attract, magnets along the track repel. Push them as close together as they will sit. You want the field to be uniform along the track and strongly varying across it.

Cool the disc, set it on the track, and give it the lightest possible push. It is locked across the track but free along it, so it keeps going until air resistance and small field irregularities stop it. Time how long a single push lasts, and repeat it five times — the spread between runs is itself a result worth reporting.

Build 3 — introduce your variable

Now change one thing at a time and measure. Insert a spacer to widen the gap between the two magnet rows and repeat the timed push. Or cool the disc at two different heights above the same track and mark where it settles in each case.

Take five readings per condition, not one. Superconductor demonstrations vary between runs — how much they vary is a genuine finding, and showing that you know to repeat measurements is worth more to a judge than a single dramatic result.

Observe and think

  • Why is the disc stable sideways as well as vertically? What would happen if only the Meissner effect were involved?
  • Why does the disc return to the height at which it was cooled, rather than to the closest approach?
  • What is actually stopping the disc on a straight track, if there is no contact friction?
  • Why does the effect end abruptly rather than fading away gradually?

Safety

Liquid nitrogen boils at −196 °C and causes cold burns on contact. Work in a ventilated room, wear eye protection and insulating gloves, never seal it in a closed container, and have an adult present. The disc stays dangerously cold for a while after it leaves the bath — always move it with tongs. Full guidance and a downloadable risk-assessment template are in the liquid nitrogen guide.

Common mistakes

  • Not cooling for long enough. Wait until the bubbling calms. A partly cooled disc will levitate weakly and drop early.
  • Magnets all facing the same way. The field then barely varies above the surface and there is little for the vortices to pin to.
  • Handling the disc warm-side down. Frost forms quickly; keep the cooled face towards the track.
  • Reporting one run. Repeat everything five times and report the spread.
  • Calling it anti-gravity. Gravity is unchanged throughout. The disc is held by pinned magnetic flux, and saying so correctly is free marks.

Where to go next

If the project goes well, the natural extension is to measure the transition itself: cool the disc while monitoring its resistance and find the temperature at which it drops to zero. That needs a four-point probe setup and turns a visual demonstration into a quantitative one.